|
To configure QoS (Quality of Service) on a router successfully, you first need to know the speed that the internet circuit is consistently stable at.
To find the stable speeds of the circuit, we recommend using an internet speed test, running it at least 3 times and using the average speed.
For the purposes of this knowledge article, we will assume that the speed test results for the circuit, which we will be using for service, has 1.5 MB down and 1.5 MB up (this is just an example, results will differ for each internet circuit).
For this example, we will be using five phones (we allocate 100 KB per phone) which means that we will want to reserve 500 KB for all phones.
The remaining bandwidth, which is 1000 KB or 1MB will be used for data.
Lastly, voice will be given the highest priority and data the lowest priority.
- 500k for voice with highest priority
- 1M for data with lowest priority
How does the Mikrotik know the difference between voice and data traffic?
Mangle rules will be added that will mark the connection to and from our RTP proxy (192.92.8.0/27) and then mark those packets.
Marking RTP Connection and Packets
- From Winbox, go to IP
- Go to Firewall
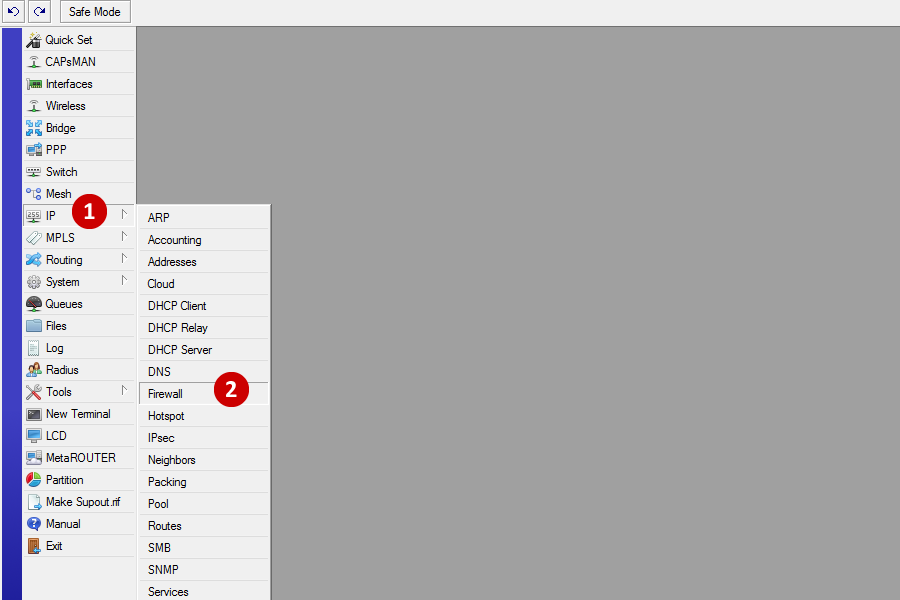
- Click on Mangle tab
- Click on Blue Plus Sign to add a Mangle rule

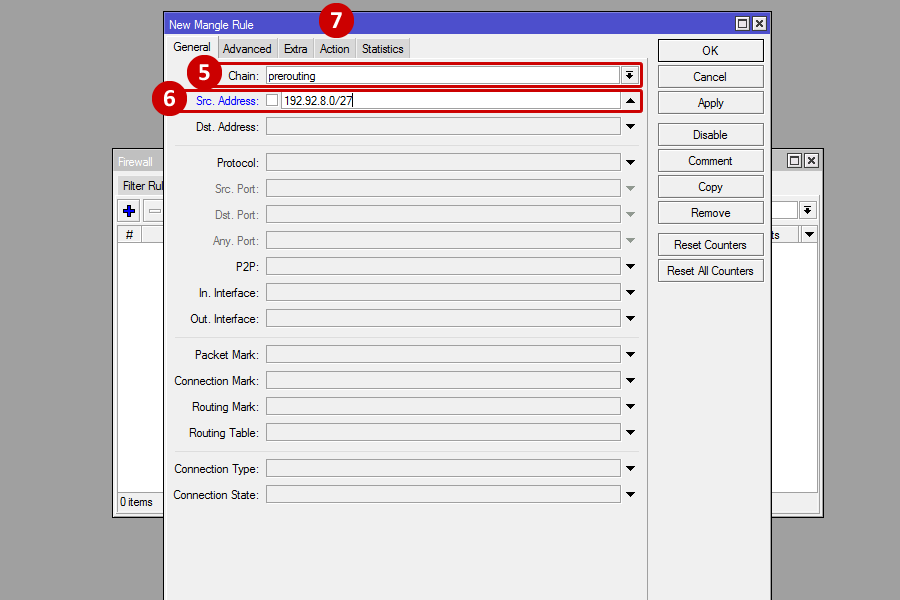
- For Chain select prerouting
- Enter in the source address (Src. Address) of 192.92.8.0/27
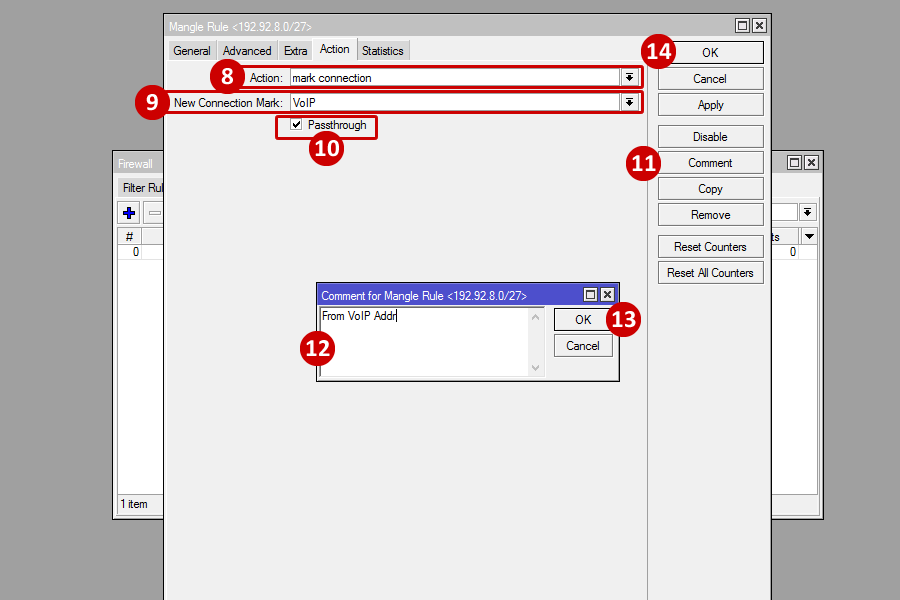
- Click on the Action tab
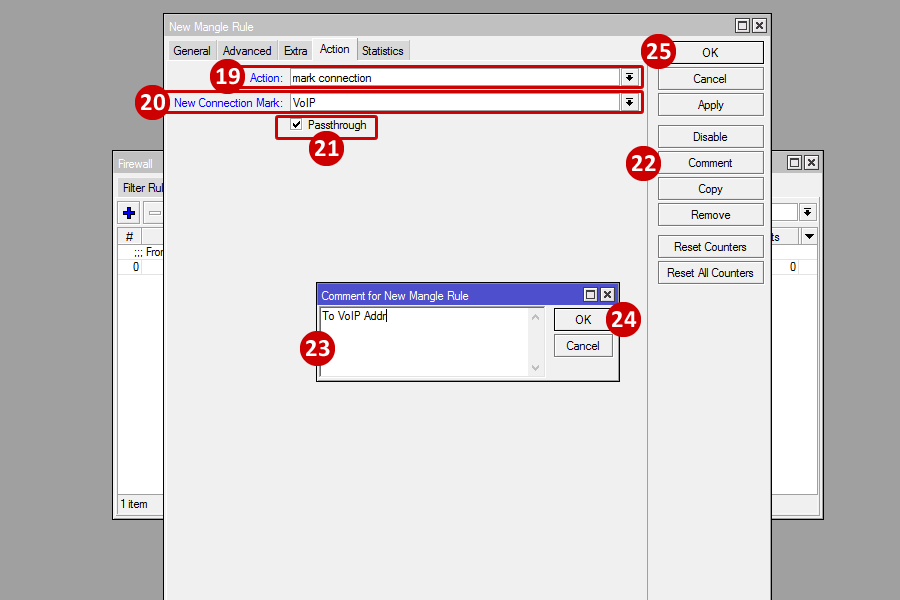
- For Action, select mark connection
- For New Connection Mark, enter VoIP
- Ensure Passthrough option is checked
- Enter a Comment
- Enter in "From VoIP Addr" (this is to identify the rule)
- Click OK to close the Comment box
- Click OK to complete the rule
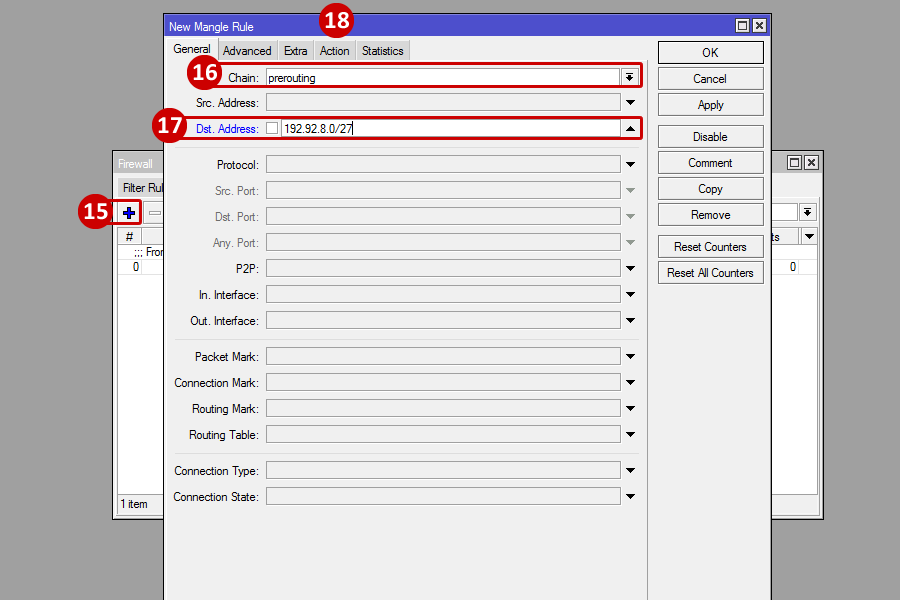
- Click the Blue Plus Sign to add another rule
- For Chain, select prerouting
- Enter in the Destination Address (Dst. Address) of 192.92.8.0/27
- Click on the Action tab
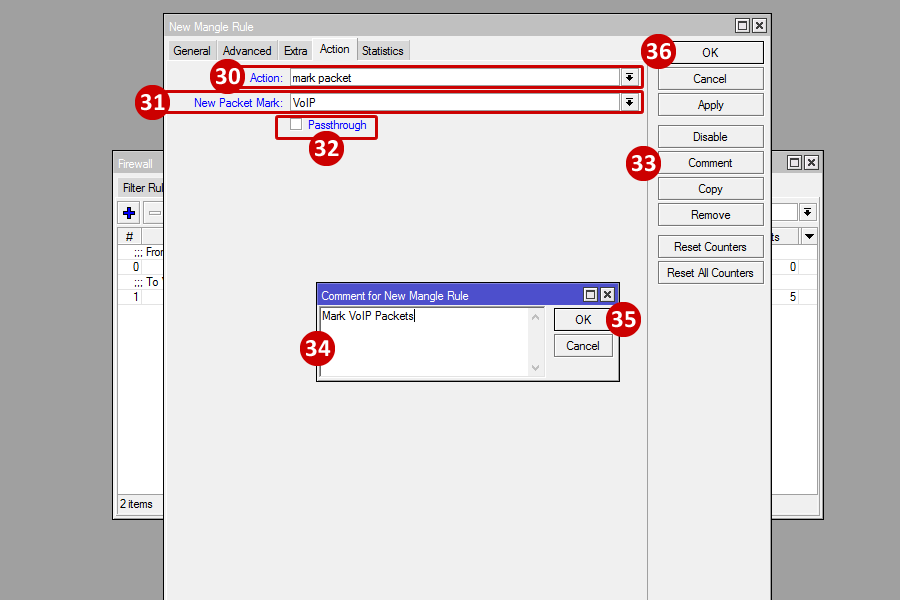
- For Action select mark connection
- For New Connection Mark enter VoIP
- Ensure Passthrough is checked
- Enter a Comment
- In the comment box enter in "To VoIP Addr" (this is to identify the rule)
- Click OK to close the Comment box
- Click OK to complete the rule
- Click the Blue Plus Sign to add another rule
- For Chain select prerouting
- For the Connection Mark select VoIP
- Click on the Action tab

- For Action select mark packet
- For New Packet Mark enter VoIP
- Ensure Passthrough is not checked
- Enter a Comment
- In the comment box enter in "Mark VoIP Packets" (this is to identify the rule)
- Click OK to close the Comment box
- Click OK to complete the rule
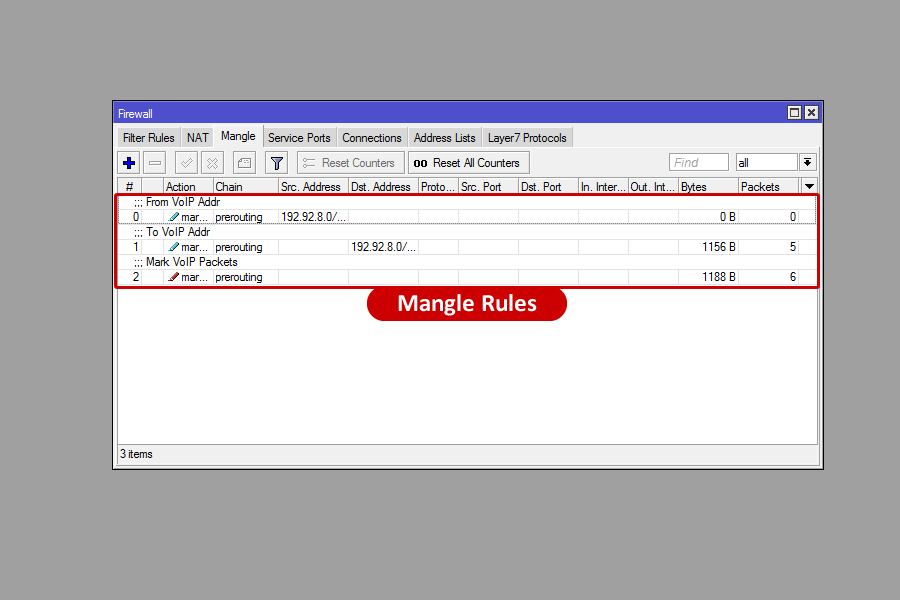
The Mangle Rules are now created.
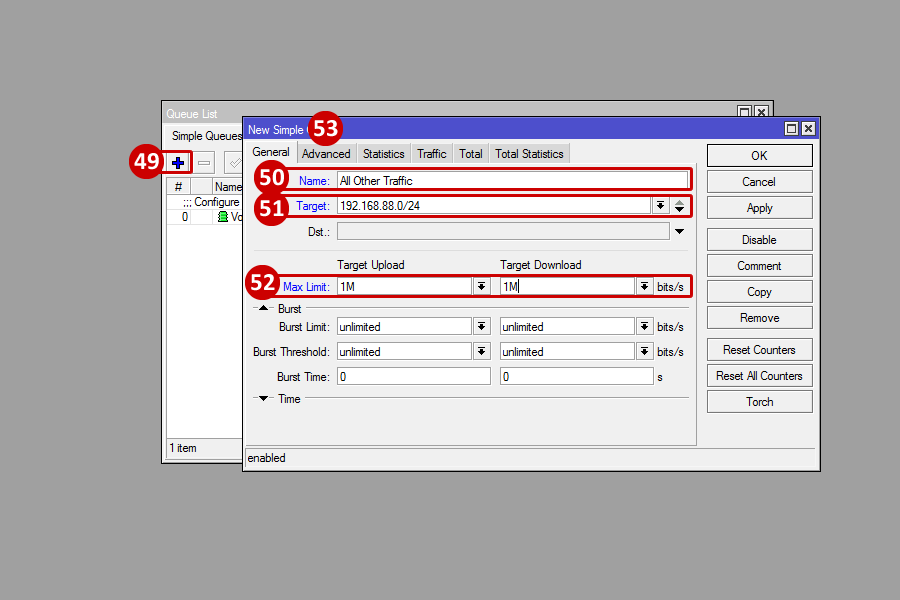
Bandidth and Prioritizing Traffic
- Go to Queues

- Click on the Blue Plus Sign to add a new Simple Queue
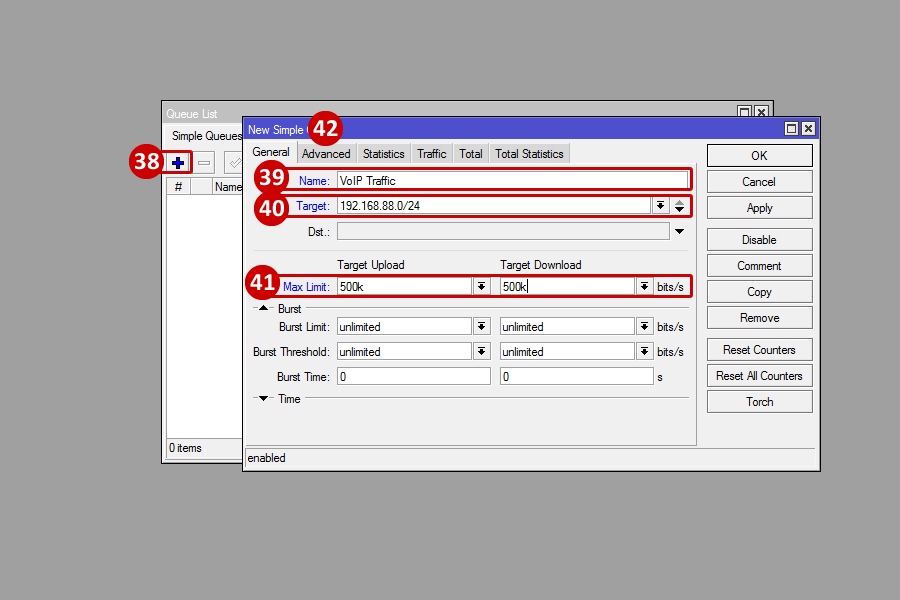
- For Name enter in VoIP Traffic
- For Target enter in the subnet being used, for this example we kept the default subnet of 192.168.88.0/24
- For Max Limit enter in the bandwidth being allocated for Voice (as per our example we are using 5 phones and allocating 100k per phone)
- 500k for Upload
- 500k for Download
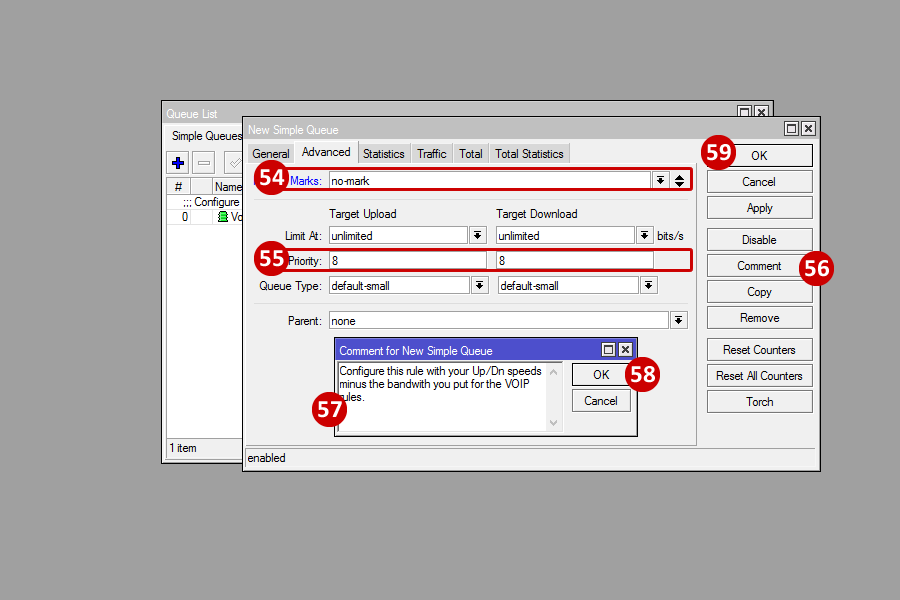
- Go to Advanced tab
- For Marks select VoIP (using dropdown menu)
- For Priority enter 1 for Target Upload and Target Download (1 is the hightest priority)
- Enter a Comment
- In the comment box enter in "Configure Up/Dn speeds in this rule by multipling the amount of phones x 100k" (this is to identify the rule)
- Click OK to close the comment box
- Click OK

- Click on the Blue Plus Sign to add a new Simple Queue
- For Name enter in All Other Traffic
- For Target enter in the subnet being used, for this example we kept the default subnet of 192.168.88.0/24
- For Max Limit enter in the bandwidth being allocated for Data (this is the difference from 1.5M - 500K = 1000k or 1MB)
- 1M for Upload
- 1M for Download
- Go to Advanced tab
- For Marks select no-mark (using dropdown menu)
- For Priority enter 8 for Target Upload and Target Download (8 is the lowest priority)
- Enter a Comment
- In the comment box enter in "Configure this rule with your Up/Dn speeds minus the bandwith you put for the VoIP rules." (this is to identify the rule)
- Click OK to close the comment box
- Click OK
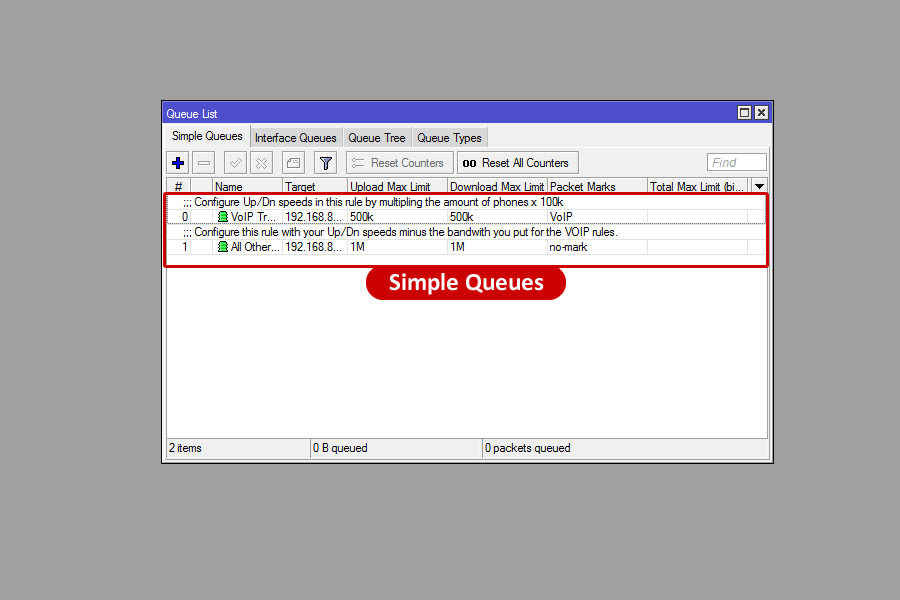
The Simple Queues are now created (when adding down, 500k + 1M = 1.5M, this needs to equal the application speed test results).
Active Call
If you open the VoIP Traffic Simple Queue by double clicking the queue and go to the Traffic tab during an active call, the queue will present the bandwidth being used for the call.

| 