Creating Time Frames
Time Frames determine specific hours of certain days or a span of days when features like Time of Day Phone Number Routes and User Answering Rules will be active.
A PBX system may have multiple time frames to help determine all the specific times when certain actions or operations may occur.
Common time frames may include:
- "Business Hours" like Monday - Friday, 9AM - 6PM.
- "Holidays" like July 4, January 1, etc....
Tips:
- It is a good idea to have one or more time frames ready before you begin creating time of day phone number routes and answering rules.
- Give your time frames meaningful names that describe the time period and purpose.
- Time Frames created at the system level are shared and can be used for system features and user features.
- Time Frames created by a User can only be used by that User.
- The same Time Frame can only be used per feature or setting.
There are 3 types of Time Frames.
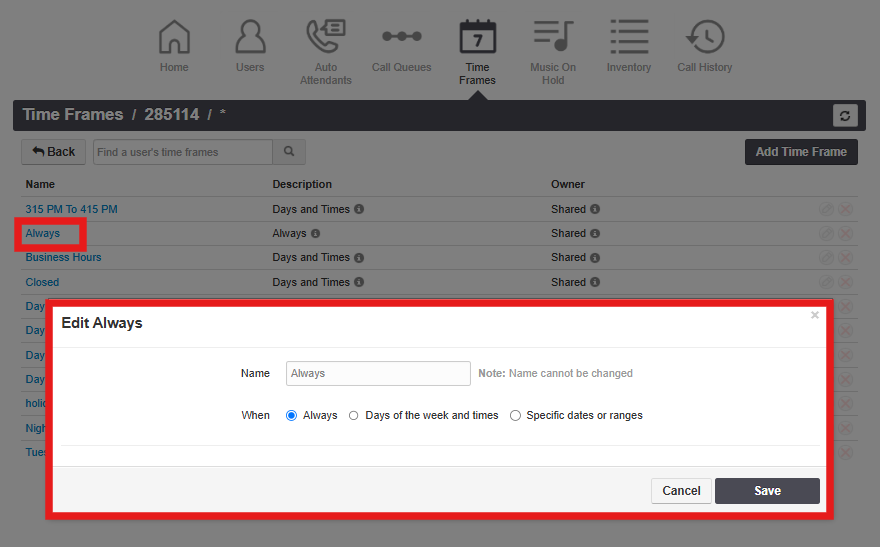
- Always: Always active 24/7/365
- Days of Week and Times: Good for creating schedules with one or more days of the week.
- Specific Dates or Ranges: Good for creating schedules with specific calendar dates.
Creating Time Frames
1. Login to the PBX Dashboard and go to the Time Frames page.
2. The first type of time frame you should create is an "Always" or "Catchall" time frame. This will kick in when no other time frame is applicable.
3. Next you may want to create a "Business Hours" time frame. For this type of time frame you will use the "Certain days of the week and times" option.
4. Some Customers like Doctors offices may have 2 ranges within the one day when they are open. For example: 9AM - 1PM and 2PM - 5PM. To create a split range like this click on the green + sign.
5. You can also create a "Holiday" time frame with certain calendar days you know will be closed or need special routing that you would like to configure in advanced. For this type of time frame you will use the "specific date or ranges" option. If specifying a single day like July 4 select the same date in the From and To. If specify a date range pick the first and last date like December 31 and January 1. To add multiple days or ranges click the green + sign.
Don't forget that you can create as many time frames as you'd need or like.
Once you are done creating your time frames you are ready to setup the rest of your PBX.
Related Articles
Route Phone Numbers Based on Time of Day
This article will help you create a Time of Day based inbound route. For example: A call flow where calls during business hours route to the main Auto Attendant and during off hours (any other time) go straight to voicemail or some other destination. ...A-Z Cheat Sheets : Creating a New Hosted PBX Customer
Add New Customer Log into the RingLogix App. On the Get Started welcome window click New Customer. You can also click the New + link on the left grey menu of the Customers section. Complete the form by entering the customers contact and billing ...How to enable Day Mode routing
The Day Mode feature allows a User on the PBX to toggle day/night call routing, for one or multiple phone numbers, by dialing a star code. Some things to know. Dialing *329 (*day) will toggle the feature on or off. The feature requires creating a ...Answering Rules
By default, every Users inbound calls will try to ring their main device for 25 seconds and if the call is not answered it will then go to their voicemail. Answering Rules allow the User to have pre-configured profiles that control their inbound ...6. Creating Speed Dials with BLF (Busy Lamp Field)
The UC+ softphone supports the creation of speed dials which at the same time can be used as BLFs to check the status of the user. This is how BLF statuses are displayed on the app: IDLE RINGING ON CALL To create speed dials/BLFs select the “Quick ...