|
This articles demonstrates how to point certain popular phone brands to the RingLogix Endpoint Provisioning Server (NDP).
Notes:
- Always factory reset your phone before trying to auto provision it.
- Ensure your device is running a current firmware version.
- Devices with old firmware may not provision or function properly.
GrandStream
- Find IP for the Device
- Plug in an analog phone to the phone port.
- Press the button on the top of the ata.
- dial "02" to hear the current IP address played for you.
- Access the Web UI of the phone using the IP address found in the previous step. Default Login/Password is "admin"/"admin"
- If the Web UI is only asking for a password then it will either be "admin" or "123"
- Navigate to Advanced Settings page and scroll down until you get to the "Firmware Upgrade and Provisioning" section.
- Change the "Config Server Path" to Match the following picture, using the syntax auto.simplelogin.net/cfg and selecting the http radio button.

*Notes:
- If you were not able to find "Config Server Path" on the phone's Web UI then provisioning must be done on the phone itself.
- To do this; navigate on the phone, to Menu > Config > Upgrade > Config Server
- Once there enter the server address for your Endpoints Module in this format: auto.simplelogin.net/cfg
- Hit ok, then you will be prompted to do a reboot.
Cisco
NOTE: For CISCO SPA ATA's and phones follow the Linksys Settings.
You have to set this via the phone
- Press the Settings button
- Unlock the phone
- Early models, you can press "**#" and see the lock open up
- Newer models unlock by scrolling to the bottom of the settings menu and clicking on "Unlock phone", default password is "cisco"
- Navigate Network Configuration
- TFTP Server", change to "yes"
- Enter the IP of the Endpoints Module. NOTE: Cisco does not support any letters so be sure to enter the IP address using numbers only.
- Save and Exit
Linksys
- Find the IP address for the Device
- Linksys Phone (941,942,etc)
- Press the Setup button. Navigate down to Network.
- Look for Current IP.
- Linksys ATA or router(SPA112, SPA122, PAP2T, SPA2102,etc)
- Plug in an analog phone to the phone port.
- Press "****" to access menu
- Dial "110#" to hear the current IP address played for you.
- Access the Web UI of the phone using the IP address found in the previous step
- Navigate to Admin --> Advanced page and Click on the Provisioning tab.
- Change the Profile Rule to Match the following picture, using the syntax http://auto.simplelogin.net/cfg/spa$MA.cfg

Polycom
NOTE: For SoundPoint/IP series phones must be at this version to work:
UC Software Version 4.0.14.1580
BootROM Software Version 5.0.14.0580
UC4 firmware allows for setting the provisioning URL via the web, otherwise, you can do it from the phone.
UC4 Web Interface
- Get the phone IP from Menu -> (Settings) -> Status -> Network -> TCP/IP Parameters
- Open a web browser to the IP you found and log in as username Polycom with password 456
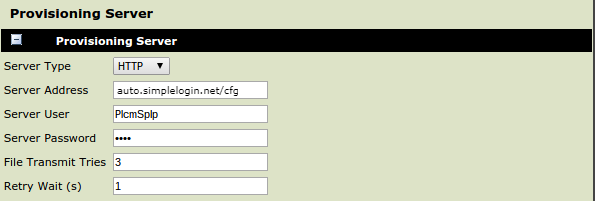
- Go to Settings -> Provisioning Server
- Set the Server Type to HTTP and Server Address to auto.simplelogin.net/cfg
- NOTE FOR POLYCOM D230 MODEL use:
Phone Menu
- Press the Menu button, navigate to Settings then Advanced
- Type in the password, default is "456"
- Navigate to Admin Settings then Network Configuration then Server menu
- Change "Server Type" to HTTP
- Enter the "Server Address" to auto.simplelogin.net/cfg
- Exit and Save, the phone should reboot
Yealink
Depending on the firmware and model your device, its interface may look like either of the options below.
Option 1
- Determine the IP of the Phone and navigate to the IP via a browser.
- The default username/password is admin/admin
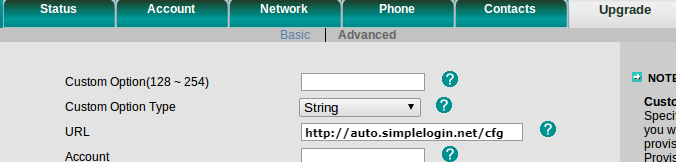
- Navigate to the "Upgrade" and to the "Advanced" sub-tab.
- In the URL field enter http://auto.simplelogin.net/cfg/
- Also, confirm that the "Check New Config" is set to "power on"
- Hit "Confirm" to save and configure the phone.

Option 2.
- Determine the IP of the Phone and navigate to the IP via a browser.
- The default username/password is admin/admin.
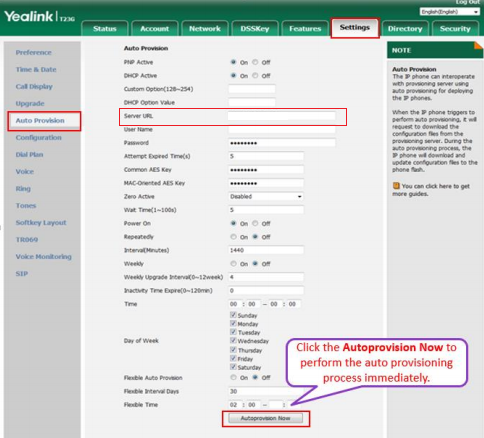
- Navigate to the "Settings" tab and to the "Auto Provisioning" sub-tab.
- In the URL field enter http://auto.simplelogin.net/cfg/
- Also, confirm that the "Power On" is checked.
- Hit "Auto Provision Now" to save and configure the phone.
Panasonic
Phone Menu:
- Turn on the Phone’s Web Interface by doing the following.
- Go the device Menu > IP Service > Network Settings > Embedded Web
- In this window Select the option for on and click Save.
- Then obtain the IP from the device.
- Go the device Menu > IP Service > Network Settings > IP Settings
Web Interface
- Navigate to IP of device through Web Browser.
- When prompted for Username and Password use the following:
- Username: admin
- Password: adminpass
- Then Navigate to the Maintenance > Provisioning Maintenance
- In the Standard File URL field enter: http://auto.simplelogin.net/cfg/{mac}.cfg
- Note: Replace {mac} with the MAC address of the device.
- Click Save

Vtech
- Get the phone IP from Menu > Status > Network
- Open a web browser to the IP you found and log in using the following:
- Username: admin
- Password: admin
- Go to Servicing > Provisioning
- In the Provisioning Server field enter http://auto.simplelogin.net/cfg
- Click Save and Reboot device

Fanvil
Note: For X Series Enterprise IP Phones, the minimum Software Version is 1.6.1
Auto provisioning for this device only allows Basic Registration
- Determine the IP of the Phone by going to Menu > Status.
- Open a web browser to the IP you found and log in using the following:
- Username: admin
- Password: admin
- Navigate to Auto Provision
- Click on Static Provisioning Server
- In the Server Address field enter: http://auto.simplelogin.net/cfg
- Change “Protocol Type” to HTTP
- Change “Update Mode” to Update After Reboot
- Click Apply and reboot the device

Snom
- Get the phone IP from Menu > Information > System Information
- Open a web browser to the IP you found
- Go to Advanced > Update
- In the Server URL field enter http://auto.simplelogin.net/cfg/{mac}
- Click Apply and Reboot device

Avaya
Phone Menu:
- From the phone go to Admin button
- Enter password 27238
- Scroll to Web Server and Enable
- Click Save and Back
*Phone will reboot
- Get the phone IP from IP Configuration > Ethernet IPv4
Web Interface:
- Open a web browser to the IP you found
- Enter the following information to login:
Username: admin
Password: 27238
- Go to Management > HTTPS Provisioning Server
- Enter the following information:
HTTPS Server Address: auto.simplelogin.net
HTTPS Server Directory Path: cfg
- Click Save and Restart device

| 