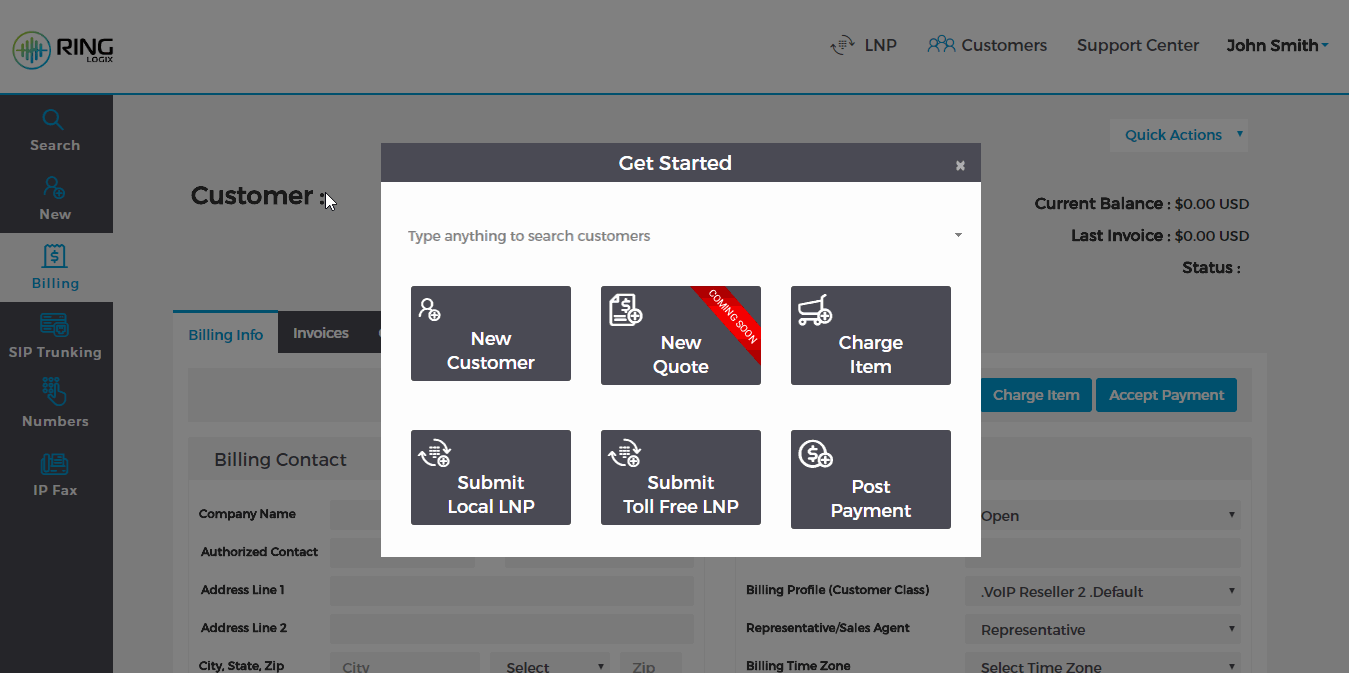
Add New Customer
- Log into the RingLogix App.
- On the Get Started welcome window click New Customer.
- You can also click the New + link on the left grey menu of the Customers section.
- Complete the form by entering the customers contact and billing details.
- Click Save Changes.
*After adding a new customer you can then go to any service page to activate new services. After a new service has been activated you then can purchase and route numbers to that service.
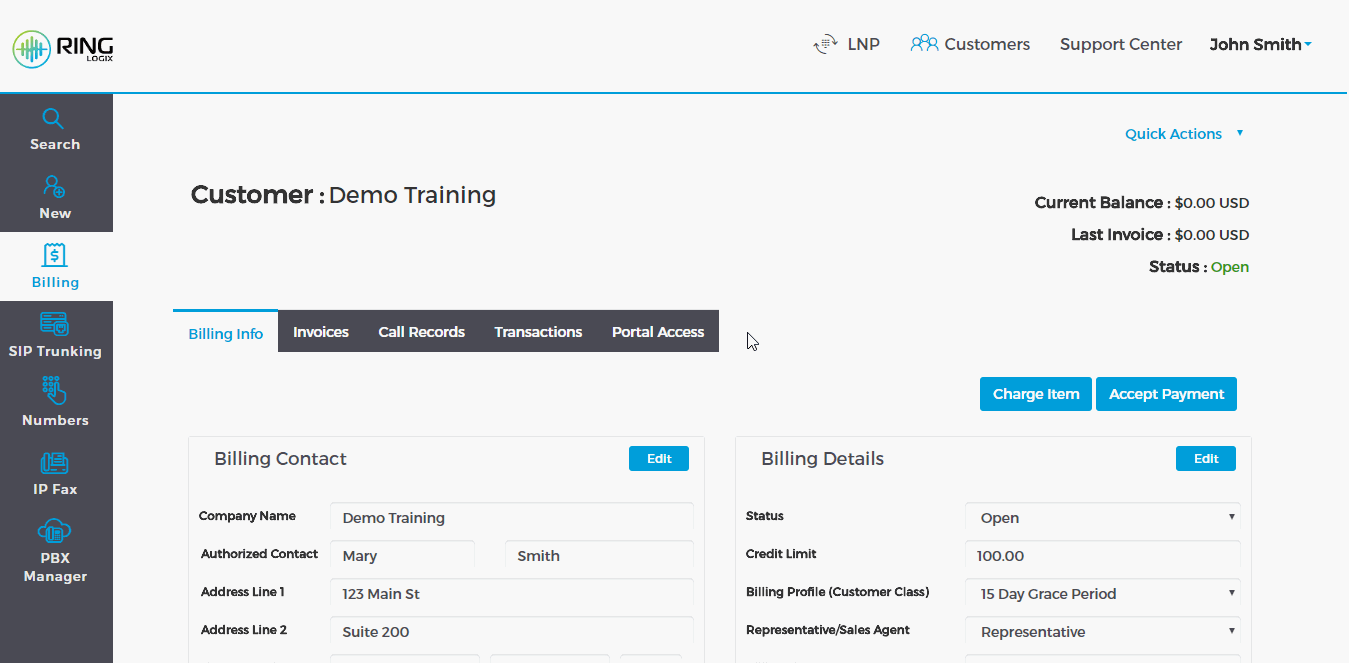
Important Fields
- Email: This is the address where the customers invoices and billing notifications like payment reminders and suspension warnings will be sent. You can add multiple addresses by pressing the Tab key
- Zip: The zip is used by the Avalara tax engine to determine the customers jurisdiction and calculate taxes.
- Billing Profile: The billing profile contains the global billing settings like is invoicing delivery, collection intervals and auto pay enabling. For more information please see Platform Settings.
- Credit Limit: This is our most basic fraud protection tool. It is the amount a customer can owe you before toll charges like international calling and inbound toll free are rejected. It is designed to protect the Partner and Customer from excessive call charges and NOT to interfere with daliy calling. Free minutes included in the Plan are not affected by the credit limit. As a general rule the credit limit should equal 2x or 3x the expected net monthly billing amount. For example: a customer purchasing 3 services at $30 each, equaling $90 monthly, should receive a credit limit of approximately $180-270 dollars. If you expected the customer to use a high amount of internation long distance or inbound toll free you will want to lean towards to higher number.
Buy New Phone Number
New phone numbers are available from all 50 states and over 12600 rate centers. Use our Buy Number wizard to search our carrier’s live inventory and then select and assign numbers to an active service. All new numbers are instantly active.
Search, Select and Activate New Phone Numbers.
- Add or Search for an existing customer. To search for a customer type any customer info in the search field of the Get Started window or after clicking Search on the left grey menu of the Customers section.
- Click the Phone Number link on the grey menu.
- Click the Buy New Number button.
- Select the Type; Local or Toll Free.
- Select the State.
- Select the Rate Center*.
- Click the numbers you want to purchase.
- Click Next.
- Select the Service Type you want to route the numbers to.
- Select the Destination service.
- Click Save Changes.
*Note: If the number is for future use or you do not want to use the number yet, you may select No Route - Store in Inventory on the Routing Method drop down menu. ALWAYS test new numbers before publishing them or providing them to your customer.
Porting Phone Numbers
The RingLogix porting system is an automated self-service LNP management tool that allows Partners to submit port request directly to our underlying carriers. By following our simple 3 step wizard you can transfer your customers numbers quickly and efficiently while reducing provider side paperwork and ticket follow ups.
Our managed LNP solution is a concierge service that increases port success rates and greatly decreases common issues with rejections due to informational mismatches. Should a common rejection for address or name mismatch occur our system will automatically attempt to retrieve the correct information via a CSR request and automatically update the order for you.
This article will walk you through the 3 steps for submitting a port request. Look for more information below on the typical life cycle of a port request
Submitting a Number Port.
- Login to the RingLogix App.
- Search and Select an existing Customer.
- Click the Phone Number link on the grey menu.
- Click the New Local LNP button.
- Step 1 Customer Info (Fig-1)
- Current Carrier: Current provider that bills the service.
- Customer Name: As printed on the invoice.
- Authorized Contact: As printed on the invoice
- Service Address: Usually as printed on the invoice.
- Click Next.
- Step 2 Number Details (Fig-2a and Fig-2b)
- Port Type: Select All or Some numbers. Click the (?) icon for more info.
- Requested Due Date: Date you would like the numbers to port. This date is not guaranteed. Numbers will ultimately port on the date the losing carrier decides to release them.
- Billing Telephone Number: Main number on the Account
- Account Number: As printed on the invoice.
- PIN: Only required for some mobile ports or accounts with security pins.
- Numbers to Transfer: All the number to port on this order.
- Click Next.
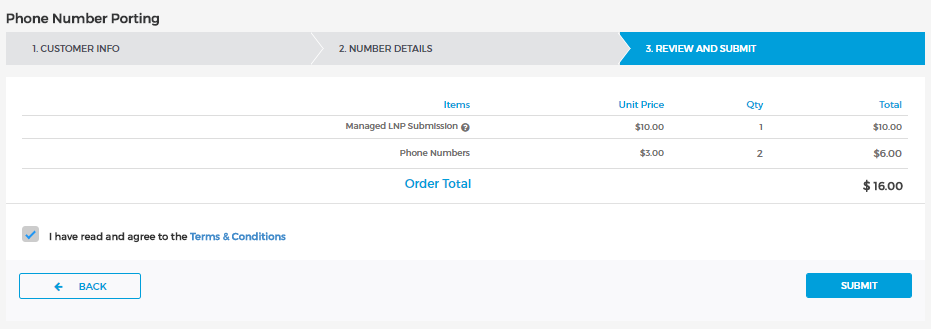
- Step 3 Review and Submit (Fig-3)
- Check and Agree to the Terms and Conditions.
- Click Submit.
Fig-1
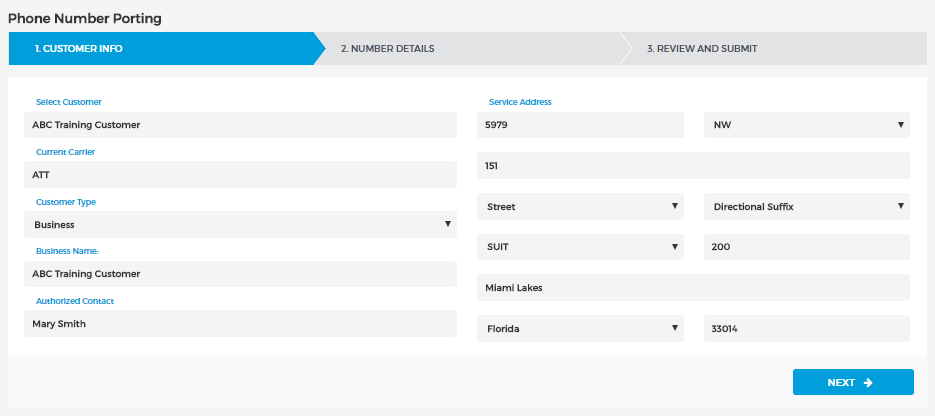
Fig-2a
Fig-2b
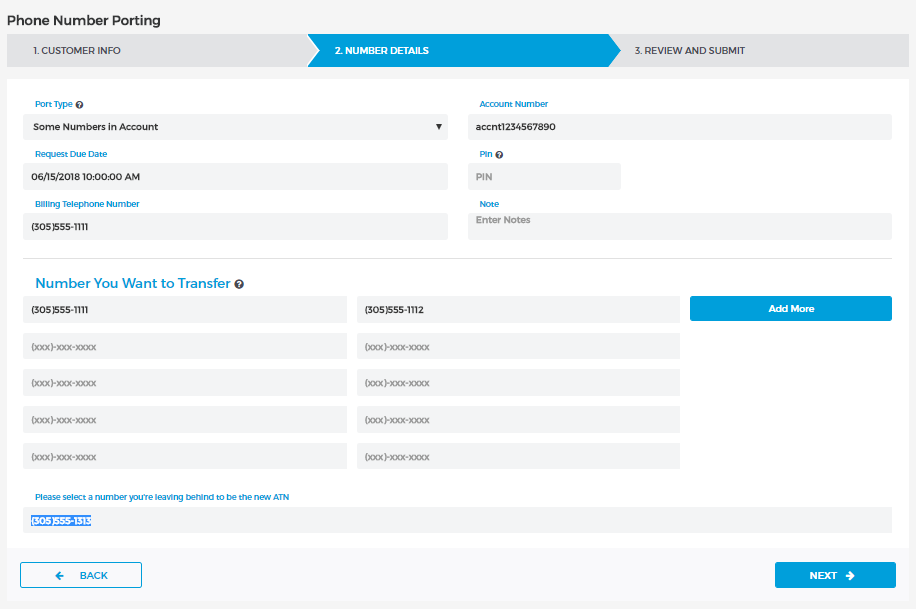
Fig-3
Add New Hosted PBX
Create a PBX
- Add or Search for an existing customer. To search for a customer type any customer info in the search field of the Get Started window or after clicking Search on the left grey menu of the Customers section.
- Click the PBX Manager link on the grey menu.
- Click Yes on the Activate a New PBX window.
- Complete the form details.
- Plan: Minute plan, usually Unlimited US or Metered
- Nick Name: A nickname for the PBX. For example, Main.
- Max External Calls: Total allowed inbound and outbound call paths for the PBX.
- Caller ID Name: Default CID name applied to new Users on outbound calls.
- Caller ID: Default CID number applied to new Users on outbound calls.
- 911 Caller ID: Default CID number applied to new User for emergency calls.
- Local Area Code: Customer area code for 7 digit calling.
- Time Zone: Used to time of day settings.
- Click Save Changes.
*Note: Our white label Hosted PBX solution is compatible with any SIP enabled IP Phone. Auto Provisioning is available for officially supported devices. This means RingLogix will manage the devices firmware and core configuration settings. See our Device Configuration Articles for more information.

Add Users to the PBX
After creating your customers PBX you can now Add Extension Users.
- Select the Users tab.
- Click Add User.
- Complete the form details:
- How Many Users?: Amount of billable User Extension you want to add.
- Default Scope: Default User type for all the Users. Can be changed after for select Users.
- Default Price: The default monthly subscription(s) to be billed for each User. Click Add, make your selection and pick a start date.
- User Details: Enter the Extension number, First and Last Name, and Email for each User. This email is where PBX messages like voicemail-to-email are sent.
- Click Save Changes.
*Note: Subscriptions activate on the selected Start Date. Once a subscription is activated the billing system will calculate the prorate charges for the current billing period. Prorated charges will be included on the next invoice. See our Customer Billing Articles for more information.

Manage and Setup the PBX
Click the PBX Dashboard button to enter and setup the PBX features like phone number routing, auto attendants, call queues, etc.
Generally speaking you will want to complete these steps:
Add a Phone or Device to a PBX User
The RIngLogix Hosted PBX platform supports auto provisioning of most popular phone models.
In addition, our platform supports multiple devices per User with the same extension number. This allows a User to have their main desk phone and additional phones at remote locations and or use of our mobile and web phone apps.
Some quick notes:
- Adding a phone or device to a User requires Admin or Office Manager access to the PBX portal.
- Each User has a default main registration record to add heir first phone to.
- Phones can be added to an existing registration record at the PBX Phone Manager or on the Phone tab of any User.
- Additional phones require creating a new registration record and must be done at the Phone tab of the User.
- Each device will use the Users configured emergency caller ID for 911 calls. You can override this value per device. You must activate the e911 feature on any number used for 911 caller ID purposes.
How to add a Phone directly to a User.
This requires admin or office manager access.
1. Once logged in to the PBX go to the Users page.
2. Click the name of the User you want to manage and go to the Phones tab.
3. Click the existing registration record you want to add a device to. For example 101 or 101a. If you do not have one then click Add Phone.
4. On the Add Phone window select the Model and enter the MAC Address.
5. In the Line Number menu select the line key you want the extension on. Usually #1.
6. Click Save
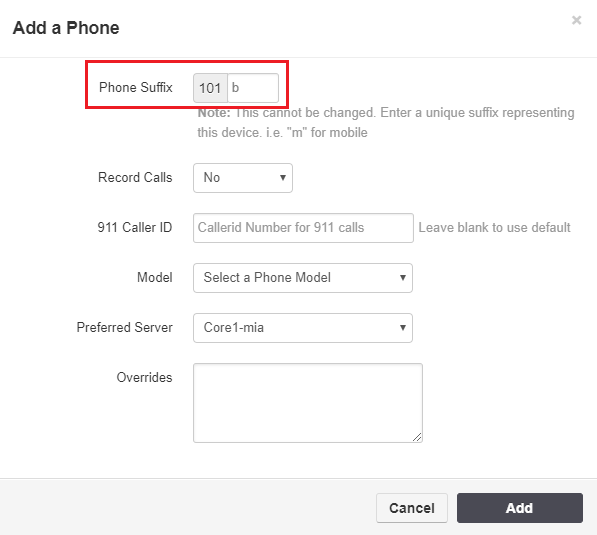
How to Add an Additional Phone to a User.
1. Follow the directions "How to Add a Phone Directly to a User"
2. If this is a extra phone you will see a Phone Suffix field on the Add Phone window.
3. Enter a letter like "a", "b" or "h" for home. This will create an add-on registration to the main User. The suffix "m" and "wp" are reserved for the mobile and web phone apps.
4. Complete the remaining fields and click Save.
How to Add a Phone to an existing User at the PBX Phone Manager.
This requires admin or office manager access.
1. Once logged in to the PBX in the Manager view go to the Phones menu.
2. Click the Add Phone button.
3. On the Add Phone window select the Model and enter the MAC Address.
4. Select a Line key slot and begin typing the name or ext number of the existing user you want to add to that key.
5. Once done click Save.
*If the User is not showing in the line key field it means they do not have a registration record. You should not add the same User registration record to more than one device. Follow the directions below to learn how to create additional registration records.
Auto Provisioning - Add Server URL to a Device
| 